Share This Post:
Setup Voicent to Use Your Shoretel PBX System
Step 1: Create IP Extensions
Configure Shoretel’s PBX system to create user extension(s) for SIP device. The following are copied from Shoretel 8000 user manual. Your system maybe different, so check the user guide that comes with the Shoretel system.
Create a user extension for the IP 8000. This is accomplished from ShoreWare Director by selecting “Administration” followed by “Users…” then “Individual Users”. This action will bring up the “Individual Users” screen.
At the top of the page, to the right of “Add new user at site:” select the desired site (from the drop down menu) where the user will reside and select “Go”. This action brings up the “Users” “Edit Users” screen. Define the “First Name” and “Last Name” as you deem appropriate.
ShoreWare Director will auto-assign the next available “Number” (i.e. extension), you can modify it to any available extension. Define the “License Type” as needed, in this example we chose “Extension and Mailbox” although it’s not necessary to have a mailbox.
Define the proper “User Group” and set the “Home Port” to “Any IP Phone”. Save your changes, then scroll down to the “SIP Password:” section.
Once you have an extension configured, get the SIP credentials for the extension. The SIP credentials is the information about the extension, SIP password, and IP address of your Shoretel system.
Step 2: Configure Voicent Software
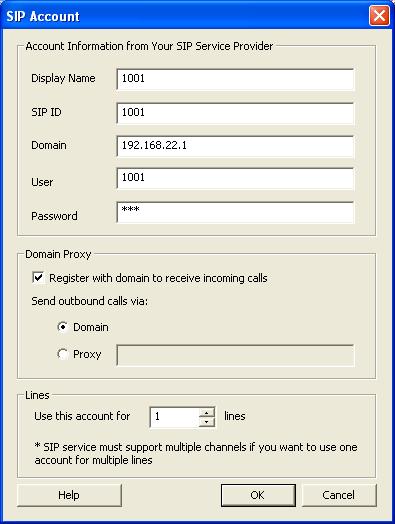
Open Voicent’s Software, select Setup > Options > SIP tab, and click the Add button. Enter your extension information as shown below. The display name, SIP ID, and User field should be your extension number, password is
your SIP password for the extension, and Domain is the IP address of your Shoretel system.
Please remember to replace the setting values with your own extension info.

If you want to setup multiple lines, you need to repeat the steps to create additional extensions.
Share This Post:
